Showing posts with label dessert. Show all posts

Wednesday, November 26, 2014

Pumpkin Pecan Pie

Thanksgiving dinner came a little early this year. I really can't complain. Now I get to go ahead and start listening to Christmas music. And decorate…although I still need to get a tree…Anyways, I made our pie. I did some Pinterest-ing and Google-ing, and somewhere I came along this Pumpkin Pecan Pie with, what I'm calling, an Egg Nog sauce. It's completely perfect. My most favorite holiday flavors all in one bite. Bonus: I physically cannot digest it, so the absurd amount of calories don't count. Perks of not having a gallbladder? 


Pumpkin Pecan Pie

Pumpkin Filling:
1 cup pureed pumpkin
1/4 cup firmly packed brown sugar
2 TBSP granulated sugar
1 large egg, beaten
1 TBSP unsalted butter, softened
1 TBSP vanilla 
1/4 tsp salt
1/4 tsp cinnamon
1/4 tsp nutmeg
1/4 tsp all spice

Pecan Filling:
3/4 cup granulated sugar
3/4 cup corn syrup
2 large eggs, beaten
1 1/2 TBSP unsalted butter, melted
2 tsp vanilla
1 pinch salt
1 pinch cinnamon
3/4 cup chopped pecans

Directions:
  • Preheat the oven to 325*F.
  • Prepare your favorite pie crust or use a pre-made pie crust dough. Grease an 8-inch springform pan. Place the dough inside, pressing it up the sides. Place in the fridge to chill while you make the filling.
  • In a medium mixing bowl, combine all the ingredients for the pumpkin filling. Mix and set aside.
  • In another medium bowl, combine all the ingredients for the pecan filling. Mix and set aside.
  • Pull your crust out of the fridge. Pour the pumpkin mixture in, spreading evenly across the bottom. Pour the pecan mixture over that. 
  • Place in the oven and bake for about 2 hours or until set.


Egg Nog Sauce

4 TBSP unsalted butter
1 large egg
1/3 cup granulated sugar
1 tsp vanilla
1/2 TBSP very hot water
1/4 cup heavy cream
1/4 cup bourbon or whiskey
Nutmeg & cinnamon to taste

Directions:
  • Melt the butter in the top of a double broiler set over gently simmering water.
  • Beat the sugar, egg and vanilla in a small bowl until blended. Add to the melted butter.
  • Add the hot water and stir until the mixture thickens enough to coat the back of a spoon (about 7-8 minutes).
  • Remove from double broiler and cool to room temperature.
  • Mix in the cream, bourbon, nutmeg, and cinnamon.
If you want to avoid the alcohol, but like egg nog, I'd recommend serving this pie up with some egg nog ice cream. Yum! 


Sunday, February 23, 2014

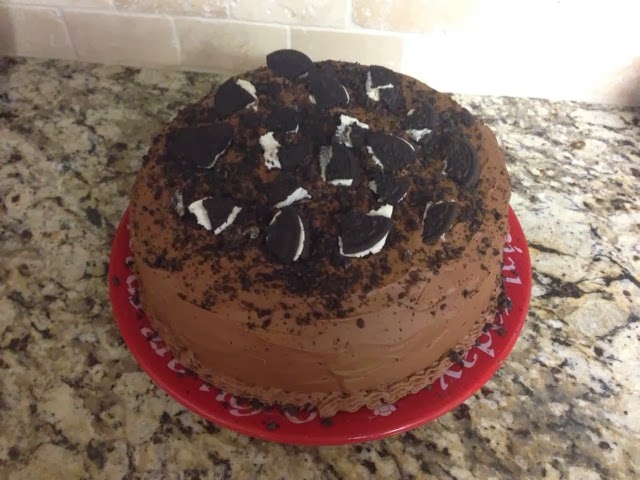
Oreo Crumble Cake with Mocha Frosting

It was someone's birthday today…so I made cake! I honestly haven't made anything else in like the last month. It's pretty sad. If it wasn't for peanut butter, and other people who will feed me, I would starve. I'm really only kind of kidding.

I took a couple of different recipes and came up with an Oreo Crumble Cake topped with mocha frosting…there is also like a cookies & cream filling involved. The father (it's his birthday) is a fan of Oreos, chocolate cake, and coffee…so it was kind of a perfect combination.   

The cake itself has a fantastic texture. Super moist. The frosting is divine. Perfect touch of coffee flavor. The filling is great too…and I think next time I would double the recipe on the filling…or maybe just 1 1/2 it. It's a pretty fantastic cake. Really rich. Like, rich for me, rich. So for those of you who do not handle sweets well, beware. I recommend having a glass of milk. 


I will say that slicing it evenly & getting it out is a little challenging with the layer of Oreos in the center. But, hey, it's still delicious.


Oreo Crumble Cake
About 10-15 Oreos
2 cups AP flour
2 cups sugar
3/4 cup cocoa
2 tsp baking powder
1 1/2 tsp baking soda
1 tsp salt
1 packet Starbucks Via Italian Roast (or other EXTRA BOLD roast)
1 cup milk
1/2 cup vegetable oil
2 eggs
2 tsp vanilla extract
1 cup boiling water
  • Preheat the oven to 350*F and prepare 2 9" pans appropriately. Twist apart enough Oreos to line the bottom of one of the pans, cream side up.
  • In a large bowl, whisk together the dry ingredients (flour through instant coffee). Add the milk, oil, eggs, and vanilla. Beat on medium speed until combined. (I use my KitchenAid stand mixer because it's fantastic.) Reduce the speed & carefully add the boiling water so you don't slosh batter everywhere. Then beat on high for about a minute to add some air & fluff. 
  • Distribute the cake batter evenly between the pans. Bake for about 30-35 minutes, or until a toothpick comes out clean. 
  • Remove from the oven & let cool in the pans for about 10 minutes. Then, remove the cake from the pans onto a wire rack & let cool completely.
Filling:
1/3 cup whipping cream
2 tsp powdered sugar
1/8 tsp vanilla
5-6 Oreos, well crumbled (I recommend using the "pulse" button on a food processor a couple times)
  • In your stand mixer (with whisk attachment), whip the cream, sugar & vanilla until stiff.
  • Fold in the Oreo crumbles
  • Keep chilled until you're ready to use it!

Mocha Frosting
1 1/2 cups butter, softened
1 cup cocoa
5 cups powdered sugar
1/2 cup milk
2 tsp vanilla
1 packet Starbucks Via Italian Roast (or other EXTRA BOLD roast)
  • Add the cocoa to a large bowl or stand mixer. Whisk through to remove any lumps.
  • Cream together the cocoa and butter until well combined.
  • Add the powdered sugar and milk to the mixture by adding 1 cup of sugar, followed by 1 TBSP of milk. After each addition has been combined, beat on high for about a minute. It will get nice & fluffy.
  • Add the vanilla & instant coffee & mix until well combined.

I feel like putting this all together is fairly self-explanatory. And there's really no art to decorating it. I piped a little frosting around the bottom edge to finish it off a little. I crumbled the spare naked Oreos that went unused from the one with cream that were baked into the the cake…sprinkled them on top. Then I just broke a few more apart & put them on. Pretty simple. Super yummy. Enjoy!


Tuesday, January 21, 2014

The Best White Birthday Cake…SERIOUSLY!

It has been a great birthday week! I will have to share the details with you later. The birthday cake is the priority here. And while some people may take issue with baking their own cake, I'm not one of them. I love making cake...I'm also a fan of eating it. I guess I have a tendency to choose more extravagant cakes to make. You know, the kinds with filling, frosting, and ganache. More than one flavor. That kind of thing. But I also think there's something quite lovely about a simple white cake with buttercream frosting. And I wanted a really classic birthday cake-cake. I found the perfect recipe from Add a Pinch.

I cannot tell you how good this cake is. It's seriously amazing. I wish there was enough to share with you! It has a great texture. Perfectly moist. Excellent white cake flavor. The buttercream frosting compliments it beautifully. Although, white-cake-purists be warned: this recipe uses whole eggs (not just whites) and regular vanilla (not clear). Still, it's the best white cake EVER. Seriously. 


I jazzed it up a little by adding sprinkles! I mean, nothing says 'birthday cake' more than sprinkles, right? There's probably a better way of doing it, but I made my own stencil of sorts to get the numbers on the cake and leave space for the candles on the edge. It makes for a pretty fun cake. But sprinkles are to baking as glitter is to crafting, and I'm pretty sure I will be finding sprinkles in the kitchen for the rest of my life.


  • To get the recipe for the cake, click here.
  • To get the recipe for the frosting, click here. (I made 1 1/2 times the recipe and had just enough)

Sunday, October 27, 2013

Pumpkin Nutella Bars with Cinnamon Cream Cheese Frosting

I'm loving that it's pumpkin everything season! And it's feeling a little more like fall outside too. Perfection. This tasty pumpkin treat is a Pinterest find. Actually, I saw that the brother had pinned it, so I made these for him because I'm a great sister. Most of the time. The bars are nice and moist. Have great flavor. And while they're not super healthy, my version did cut out 1 cup of oil, 1 cup of granulated sugar, 1 cup of powdered sugar, and 1/2 stick of butter. And I don't feel like they are lacking on sweetness at all. Next time around, I would probably take out more of the pumpkin batter before mixing in the Nutella (I've adjusted the directions below). Then, they might actually come out "swirled." 


Pumpkin Nutella Bars
Inspiration from The Gunny Sack

4 large eggs
1 1/2 cups pureed pumpkin
1 cup unsweetened applesauce
2 cups AP flour
2 tsp baking soda
1/2 tsp salt
2 tsp baking powder
2 tsp cinnamon
2 tsp ginger
1/4 tsp nutmeg
1 cup sugar
1 cup Nutella
  • Preheat the oven to 350*F and prepare a jelly roll pan (16x12x1) with nonstick spray. 
  • In a large mixing bowl/stand mixer, beat together the eggs, pumpkin and applesauce. 
  • Add all the dry ingredients and mix until combined.
  • Pour half the pumpkin batter into your prepared pan.
  • Mix the Nutella in with the remaining batter.
  • Drop spoonfuls of the Nutella mixture over the pumpkin batter. 
  • Gently swirl with a knife.
  • Bake for 25-30 minutes.


Cinnamon Cream Cheese Frosting

8 oz reduced fat cream cheese, softened
1/2 cup butter, softened
3 cups powdered sugar
2 tsp cinnamon
1 tsp vanilla
  • In a large mixing bowl/stand mixer, beat the cream cheese and butter until fluffy.
  • Add powdered sugar, one cup at a time, beating until smooth.
  • Mix in cinnamon and vanilla.

I went ahead and put my frosting on with the bars were still warm. I feel like it makes them a little more moist. Also, I had just worked for 13 hours and didn't feel like staying awake for them to cool down… Enjoy!


Monday, October 7, 2013

Peanut Butter Pumpkin Bread with Chocolate Chips

And on my days off, I get on Pinterest and bake... It's kind of great how many things you can get done when Monday is your day off. Everyone else is working, so the day is yours. I slept in. Watched "Once Upon a Time" while I had my coffee and breakfast. I vacuumed and mopped. Did P90X-2. Showered. Made lunch. Ran errands (got my watch fixed, got part of my Halloween costume, went to Sprouts). Baked. Got some paperwork done. Pinned a million things. And I'm going to make kickboxing. Exciting stuff. 


So...Peanut butter. Pumpkin. Dark Chocolate. Score. The original recipe is from Crazy For Crust via Pinterest. I really hadn't intended to change anything...but it turned out that I only had 1 cup of AP flour on hand. Thus, I ended up doing 1 cup AP flour and 1 cup WW flour. Not bad. Generally, you can go half-and-half and not change things too much. Using all WW flour will change the texture. Of course, you can use whatever kind of chocolate chips you like...but I'm a dark chocolate kind of girl.


Peanut Butter Pumpkin Bread with Chocolate Chips

Ingredients: 
1/4 cup plain Greek yogurt
3/4 cup pumpkin puree 
2 eggs
1/2 cup natural peanut butter
1/4 cup granulated sugar
1/2 cup packed brown sugar
1 1/2 TBSP pumpkin pie spice
1 tsp baking soda
1 cup AP flour
1 cup WW flour
1 cup chocolate chips, divided

Directions:
  • Preheat the oven to 350*F and prepare a loaf pan with non-stick cooking spray.
  • In a large bowl (or your KitchenAid), mix together the yogurt, pumpkin, eggs, and peanut butter until smooth. Add sugars, pumpkin pie spice, and soda and mix. Mix in the flours. Stir in 3/4 cup of the chocolate chips. 
  • Pour the batter into the prepared loaf pan. It's thick so you'll need to even it out. Sprinkle the remaining chocolate chips on top.
  • Bake for about 30-35 minutes, depending on if you want it a little gooey in the center or baked through. 
  • Let it cool in the pan for a few minutes before transferring to your cutting board.
Enjoy!


Saturday, September 7, 2013

{Flourless} Chocolate Chunk Blondies with Sea Salt

I got in a little baking amongst everything else going on today! I had found this "healthy" sweet treat recipe on Pinterest a while back. I'm so glad I finally tried it! Plus, it was a good excuse to break in my recent Target find:


Pretty great, right? These blondies are flour-free, egg-free, refined sugar-free...but not taste-free. The big secret ingredient? Chick peas. Mixed up with honey and natural peanut butter. ANYTHING is better with peanut butter. (Fine, I realize that may not be completely true...but mostly.) I broke apart some Velata discs for my chocolate chunks. Great choice. I promise there is a difference in the taste between regular chocolate chips/chunks and Velata. It's kind of epic. 

Being me, I under-baked these babies. So mine turned out very soft and gooey. Yum. I couldn't tell you what they might be like if you actually bake them for an appropriate amount of time...but I'd imagine they still taste good! Enjoy!


Flourless Chocolate Chunk Blondies with Sea Salt
Inspired by: Ambitious Kitchen

Ingredients:
1 can (15 oz) chick peas, rinsed and drained
1/2 cup natural peanut butter
1/3 cup honey
2 tsp vanilla
1/2 tsp salt
1/4 tsp baking soda
1/4 tsp baking powder
1/2 cup broken Velata premium chocolate pieces 

Directions:
  • Preheat the oven to 350*F. Prepare an 8x8 baking dish with nonstick cooking spray.
  • Combine everything except the chocolate into a food processor (really, a Ninja or Vitamix is best). Process until the batter is smooth. Fold in the chocolate chunks. 
  • Spread the batter evenly into the prepared pan. Sprinkle a little sea salt on top. Bake for 20-25 minutes, or until a toothpick comes clean out of the center and the edges are slightly browned. 

Sunday, August 25, 2013

Key Lime Cheesecake Bars

I had the privilege of eating dinner last night with a family that is very special to me. I always make a dessert to take with me. The 7-year-old requested "key lime pie or something like that," which I found pretty amusing. I can't say I know of too many kiddos who would request anything like that. I was expecting like brownies or some kind of cake. But I enjoy a good piece of real key lime pie (not that fake lime-flavored stuff)...so I was excited to see what I could come up with. 

I hit up Pinterest and found several different recipes that I liked parts of. So, I kind of went off of those and tweaked a thing here and there. The result? Delicious key lime cheesecake bars. They were creamy and perfectly tart. A great summer dessert. I was really glad that they turned out so well, and everyone liked them. About halfway through baking them, I realized that I'd never really done this before. The cheesecake thing. I've done my grandmother's mini cheesecakes, but that's different because she had written very specific instructions that I trusted. And this was a jumble of things off the internet that I put together. But definitely tasty. Very tasty.


Key Lime Cheesecake Bars

For the Crust:
1 cup graham cracker crumbs
1/4 cup finely ground coconut
3 TBSP sugar
4 TBSP butter, melted

For the Cheesecake:
16 oz cream cheese, softened
1 cup + 2 TBSP sugar
1 cup lime juice
1/2 cup sour cream
1/2 tsp vanilla
2 1/2 TBSP all purpose flour
1/4 tsp salt
3 eggs

For the Glaze:
1/4 cup sugar
3/4 TBSP cornstarch 
1/4 cup water
2 TBSP key lime juice (takes about 4 key limes)

  • Preheat the oven to 350*F and prepare an 8x8 baking dish. 
  • Mix all of the ingredients for the crust together and pour into baking dish. Pat down until even. Bake for about 10 minutes or until the edges are slightly browned. Let Cool.
  • Reduce the oven temperature to 325*F.
  • With an electric or stand mixer, beat the cream cheese until fluffy. (I just let my KitchenAid run for about 5 minutes while I did other things.) Add the sugar and mix until combined. Add the lime juice, sour cream, and vanilla; mix until smooth and creamy. Turn down the speed of your mixer to low, and add the flour and salt, scraping the sides and bottom of your bowl to make sure everything is combined. Add all 3 eggs at once and mix until just combined. Pour over the cooled crust. Create a water bath by placing your 8x8 baking dish in a slightly larger baking dish, and fill it about 1/3 way with water. Bake for about 1 hour, until set. The center will still be a little jiggly, but it will set as it cools. 
  • In a small sauce pan, combine all the ingredients for the glaze. Whisk until smooth. Bring to a boil over medium heat, whisking constantly. Cook for a couple minutes (still whisking). Remove from heat and let cool some (but not until it's completely set). Pour over the cooled cheesecake.
  • Refrigerate until ready to serve. Top it off with some whipped cream and key lime slices.
Enjoy!

Monday, August 12, 2013

Strawberries & Cream Bars

Well... Today has been, I guess, interesting. That's probably the simplest way to put it.  So instead of getting the story of my time in London, you're getting a recipe for these sweet treats. Naturally, I found these bars on Pinterest. They make for a great summertime dessert! They're pretty delicious. Four layers of sweet goodness. They don't last long. 

The recipe came from Lil' Luna. It's a sugar cookie base topped with a cream cheese & Velata white chocolate mixture, a strawberry mixture, and whipped topping. I think it'd be fun to try it with a dark chocolatey-brownie base sometime...yum. 


Strawberries & Cream Bars

Ingredients for the sugar cookie layer:
1/3 cup shortening
1/3 cup butter, softened
3/4 cup sugar
1 egg
1 tsp vanilla
1/2 tsp almond extract
1 tsp baking powder
1/2 tsp salt
1 1/2 cups all purpose flour

Ingredients for the cream layer:
8 oz cream cheese, softened 
6 oz bag Velata premium white chocolate, melted

Ingredients for the strawberry layer:
1 1/2 cups chopped strawberries
1/2 cup sugar
1/3 cup water
2 TBSP cornstarch 

8 oz whipped topping 


Directions:
  • Preheat oven to 350 degrees and grease a 9x13 pan.
  • Cream together the shortening, butter, and sugar until fluffy. Beat in egg, vanilla, and almond until well mixed.
  • Sift in the flour, baking powder, and salt. Gradually add to the creamed mixture until well blended. 
  • Spread into the bottom of your prepared pan. Bake for 15-18 minutes or until the edges are golden brown. Let cool.
  • Melt the white chocolate as directed on the bag. Mix with cream cheese until well blended. Spread over cooled cookie layer and pop it in the fridge.
  • In a small sauce pan, mix together sugar and cornstarch. Add chopped strawberries and water. Heat on medium-high until it comes to a boil. Once it's boiling, remove from heat and let it cool for 10 minutes. Pour over cream cheese/white chocolate layer and refrigerate for 1-2 hours. 
  • Top with your whipped topping of choice. I didn't use the whole tub. Just enough to make it look good. Keep it in the fridge until ready to serve.
Enjoy!


Friday, July 12, 2013

Healthy Dark Chocolate Brownies

Healthy? Brownies? Yes. Well, pretty much. I adapted this recipe from Averie Cooks to my liking. Much of the butter is cut out by using a mashed (very ripe) avocado. Sugar? Try honey and molasses. (Although I did sprinkle the top with some powdered sugar...) The result? Soft, fudgy, chocolate goodness. I will say that if you do not like dark chocolate, you will not like these. But for those of you who are like me, this is the perfect chocolate fix! You could make them sweeter by cutting out the molasses and using all honey. And you could use regular cocoa powder instead of dark. But I like my chocolate seriously dark.


Healthy Dark Chocolate Brownies

Ingredients:
Flesh from 1 very ripe Hass avocado, well mashed
1/4 cup unsalted butter, melted
1 large egg
1/2 cup + 1 TBSP pure honey
1/4 cup molasses 
2 TBSP coffee (from your morning brew)
2 tsp vanilla
3/4 cup unsweetened dark natural cocoa powder
1/4 tsp baking soda 
1 packet instant coffee (I used Starbucks Via Italian Roast...the stronger, the better!)
1/4 cup gluten-free or all-purpose flour

Directions:

  • Preheat the oven to 350*F and generously spray an 8x8 glass baking dish with non-stick cooking spray.
  • In a large bowl, add your avocado and make sure it is well mashed. The riper the avocado, the easier to smooth it out.
  • Add the melted butter, egg, honey, molasses, coffee, and vanilla. Whisk to combine. Continue to whisk out any green streaks or lumps.
  • Add the cocoa powder, baking soda and instant coffee. Whisk until incorporated and free from lumps.
  • Add the flour and mix just until combined. Don't over mix.
  • Pour the batter into the prepared pan, and gently smooth out with a spatula. Bake for about 30 minutes or until the top has just set, it's not jiggly in the center, and the edges have firmed up. The toothpick test doesn't work here. These are fudgy, so crumbs will stick to a toothpick. Don't over bake.
  • I sliced them up and had one warm about 20 minutes after pulling them out of the oven. You could may choose to chill them. Enjoy! 


Friday, July 5, 2013

Vanilla Sheet Cake with Strawberry White Chocolate Frosting

I hope everyone had a great 4th of July! I certainly enjoyed the day, and am so thankful for all those who protect our nation's independence. The weather yesterday morning was quite perfect for the LibertyFest parade in downtown Edmond. Then, I headed to a friend's house for an incredibly delicious lunch...featuring ribs. I felt like I'd just had Thanksgiving dinner, so I took a nap. Before I knew it, it was time for party #2. A big cookout, sparklers, fireworks...good times. 


I made a vanilla Texas sheet cake with strawberry white chocolate frosting to take to the cookout. It turned out superb. I adapted the recipe from an almond sheet cake that I've made. The cake is so moist and wonderful. The frosting is pretty tasty too. The brother has requested another one to celebrate dorm life when he heads off to college in August. Ha. 


Vanilla Sheet Cake

Ingredients:
1 cup butter
1 cup water
2 cups flour
2 cups sugar
1 tsp baking soda
1/2 cup sour cream
2 eggs
2 tsp vanilla

Directions:

  • Preheat oven to 375 degrees. Prepare a jelly roll pan.
  • In a small saucepan, add the water and butter. Bring to a boil.
  • In a large mixing bowl, add the flour and sugar.
  • Pour the boiling water and butter mixture over the flour and sugar mixture. Beat well.
  • Add the baking soda, vanilla, sour cream, and eggs. Mix again.
  • Pour the batter into the prepared pan and bake for about 25 minutes or until a toothpick comes out clean. 

Strawberry White Chocolate Frosting
  • Click here to get the recipe for the white chocolate frosting. Just make a half recipe or so.
  • Slice some fresh strawberries until you have about a cup. Place in a food processor and pulse until the pieces are small enough. 
  • Add the strawberries to the white chocolate frosting and mix well.
  • Spread over cooled cake.

Enjoy! I recommend chilling the cake. But it's good either way. 


Monday, July 1, 2013

Pretzel Cookie Bars with Caramel and Chocolate Drizzle

Some friends of mine got together for a cookout yesterday evening out at Arcadia. It was a rare, beautiful summer evening. The weather was just perfect. I ended up throwing these bars together because I had everything I needed, and it was quick. Yesterday was pretty crazy, so time was kind of an issue. Like I got these in the oven and left the brother in charge...and he now knows that you have to actually take things out of the oven to stop the baking process...not just turn the oven off. Needless to say, the edges got rather dry (still pretty good dunked in milk). Thankfully, the center was still super tasty and great. All the bars disappeared, so I'm guessing people liked them!


Pretzel Cookie Bars

Ingredients:
1 cup butter flavored shortening (cringe! I know. Use butter instead. I didn't have time for it to soften.)
1 cup brown sugar
1/2 cup sugar
2 eggs
1 1/2 tsp vanilla
1 tsp baking soda
1/2 tsp sea salt
2 1/2 cups flour
1/2 cup broken pretzel pieces (more if you want some on top too!)
15 Velata milk chocolate pieces 
Caramel sauce (see recipe below)

Directions:

  • Preheat oven to 375 degrees. Prepare a 9x13 baking dish.
  • In a large bowl, cream together the shortening and sugars. Add the eggs, beating between each one. Add the vanilla; beat. 
  • In a medium bowl, combine the soda, salt and flour; whisk together. Add the dry mixture in with the wet mixture. Mix it all up. Add the pretzel bits. Mix.
  • Place the batter into the prepared dish, using your hands to even it out. Bake until the top is golden brown. Let cool.
  • Melt your Velata in a microwave-safe dish for 30 seconds. Use a spoon to drizzle it over the bars.
  • Using a different spoon, drizzle the caramel over the bars.
  • You may break apart more pretzels and sprinkle the pieces on top, if you wish.


Caramel Sauce

Ingredients:
1/4 cup packed brown sugar
1/8 cup half and half
1 TBSP butter
Pinch of salt
1 1/4 tsp vanilla

Directions:
  • In a small saucepan over medium-low heat, combine brown sugar, half and half, butter, and salt. Cook while gently whisking for about 4 minutes, until it gets thicker. Add vanilla and cook another minute to thicken further.
  • Remove from heat. Cool slightly and pour into a glass jar.
  • Let the sauce cool more before drizzling it on the bars!

Saturday, June 15, 2013

White Chocolate Raspberry Cake

The brother turns 18 tomorrow! I am so old. We ended up celebrating today because I'll be OTR tomorrow. We went to The Garage for lunch. Which, if you're in Edmond and want a burger, is definitely the place to go. I love their turkey burgers. And sweet potato fries. I was feeling adventurous today, so I got the new "Sticky Fingers" burger, which has peanut butter, bacon, colby jack, and sweet jalapeño relish. I wasn't sure about how it would taste, but I LOVE peanut butter...so I went for it. Great decision. New favorite. 

He told me a few months ago that he wanted some kind of white cake with a raspberry filling and white chocolate. And I made fun of him for wanting a girly cake. He has a thing for girly cakes. For one of his previous birthdays he wanted a legit strawberry cake, so I made Bobby's Lighter Simply Delicious Strawberry Cake. Great cake. Also very pink. So, I laughed because I had planned to do some kind of manly Dr. Pepper cake, but no, he wanted a white cake with raspberries. Bless his heart. I have been trying to decide how I would pull this off for months. Literally, I live for birthdays so I can make cake. My Pinterest feed had been full with white almond sour cream (WASC) cake, which involves taking a white cake box mix and adding stuff to make it taste like wedding cake. But I'm in this anti-box-mix phase because I like to avoid additives and preservatives and artificial whatever. I ended up finding a recipe for homemade white cake mix from Chickens In The Road. So, I took that and added the extra stuff for the WASC wedding cake, except I changed a couple things...don't tell...he liked it. What I came up with: three delectable layers of white cake, separated by raspberry laced white chocolate, smothered with a perfectly sweet and fluffy white chocolate buttercream frosting, and topped with fresh tart raspberries.

White Chocolate Raspberry Cake

For the Cake:
3 3/4 cups plus 2 TBSP cake flour
3 cups sugar
1/2 cup non-fat dried milk (like the kind by Organic Valley)
1 tsp baking powder
1/2 tsp baking soda
3/4 tsp salt
1 1/3 cups water
2 TBSP coconut oil, melted but not hot
1 tsp vanilla
1 tsp almond extract
1 cup Fage Total Greek Yogurt
4 large egg whites

  • Preheat oven to 325 degrees and prepare 3 8" round cake pans.
  • In a large bowl, combine the dry ingredients and mix.
  • Add the remaining ingredients and mix on medium for about 2 minutes.
  • Pour into greased and floured cake pans.
  • Tap the pans gently on the counter to bring the air bubbles to the top.
  • Bake for about 25-30 minutes, or until a toothpick comes out clean.
  • Let cool in pans for about 10 minutes before inverting onto wire racks to cool completely.


For the Filling:
Seedless raspberry jam (from your local natural food store)
3-6 oz Velata premium white chocolate
1-2 heaping spoonfuls Fage Total Greek Yogurt

  • In a small bowl, microwave the Velata in 30 second intervals until melted. Cool slightly.
  • Combine yogurt with the Velata and mix.
  • When the cake has cooled, spoon raspberry jam on the top of the bottom layer and spread evenly. Top with half the Velata/yogurt mixture. 
  • Place the middle cake layer on top, securing with toothpicks, and repeat.
  • Place the top cake layer on and secure with toothpicks.


For the Frosting:
6 oz Velata premium white chocolate
1 cup unsalted butter, softened
2 1/2 plus cups of powdered sugar
1/4 cup Fage Total Greek Yogurt 
1/4 tsp vanilla
A pinch of salt

  • Melt the Velata in the microwave (directions on pouch); set aside.
  • Cream together the butter, sugar, vanilla and salt.
  • Add in the chocolate and beat.
  • Fold in the yogurt, and then beat the frosting on high for about 5 minutes. It should be nice and fluffy!
  • Do a thin layer of dirty frosting over the entire cake. Place the cake in the fridge until the frosting hardens.
  • Use the rest of the frosting to make it pretty!
  • Top with fresh raspberries!


Friday, June 14, 2013

Mocha Brownies

Last night, I went to a cookout, and had a great time with several friends. It was very fun, and relaxing, especially after what I thought would be a lazy afternoon, turned into sheer craziness...to say the least. It had been a good day. I had my coffee. I'd worked out. I went to the dentist. I was cavity free. I had made the Pioneer Woman's "Mocha Brownies," and they were ready to go. I was contemplating if I should start watching a season of some t.v. show. Then, the brother and I ended up going to pick up the mother's car from the shop. He went home. I headed to the store to pick up a few things for his birthday cake. I get a call from him, "Um, you need to get dessert...for tonight...your dog ate the brownies." It's amazing how quickly your day can turn around. I had like 2 hours to get in and out of the store (which was super busy) and bake another batch of brownies. You'll notice I have two pictures... The first is a brownie from the first batch, the second from round two. 

Round one: I one-and-a-halfed the brownie recipe, so there would be enough for a 9x13 pan and still be thick. These took around an hour to bake. I halved the frosting recipe...which is almost unheard of for me. I love frosting. A lot. But not everyone feels that way, so I halved it...and there was plenty. I did, obviously, manage to sample one before my dog did. Pretty delicious. The brother approved as well. However, it was a little "cake-y" instead of gooey brownie-y. That might just be me, though.


Round two: Considering the time crunch, there was no way I could make the thick ones again. I did a single recipe, omitting one egg (so they would be more gooey). I baked them in a 10x10, making them thinner and baked within 30 minutes. I halved the frosting recipe again. They didn't have as much time to cool, and the frosting didn't get to set before I had to cut them...so they weren't super pretty. But still tasty. 

The winner? I guess it depends on if you like cake-y or gooey brownies. These are fairly rich...to most people. I can usually put down "rich" desserts like no ones business, so I'm probably not the best judge. I wish the coffee flavor had been stronger... I used an extra bold Italian roast, but I think I would recommend a shot or two of espresso. 

Click here to get the recipe from The Pioneer Woman's website. Enjoy!

Sunday, June 2, 2013

Banana Bread Bars

I totally meant to post this yesterday, but yesterday didn't really go as planned because Friday night didn't really go as planned. We spent the early evening hours in "tornado mode," and watched as another one tore through the OKC metro. I was about to go to bed when there was banging on the door. Generally, banging on the door late at night doesn't mean anything good. Especially in a storm. Turns out, the creek by the house was just about full (we were seriously flooded out in June 2010). So then, we had to switch to "flood mode" (basically get everything that's important and below waist level up higher). Got that done, went out to check the creek, and it was still rising, the rain still falling. Decided it would be better for me to take the dogs and go, just in case. Most terrifying drive across town ever. Anyway, nobody got sleep and the water got up into the yard and driveway before it finally stopped raining. SO thankful the house stayed dry! I really would rather not spend another summer on flood clean-up. I finally went to bed around 0730 on Saturday, so I missed the 0900 wedding I was planning to go to. Then, I had to spend the afternoon putting things back. I had a great evening though! I got to go to dinner and catch up with a friend. And also do Yoga-X. Love. 

Now...Banana Bread Bars...

At one point, my Pinterest feed was flooded with a recipe for Banana Bread Brownies from omg! I Love to Cook. I resisted repinning them for a long time, but it eventually happened. As luck would have it, there was a potluck last week and we had several bananas and sour cream that needed used up. Perfect. I decided to call them "Banana Bread Bars" because they remind me of the Applesauce Bars I've made, except, of course for being more banana-y. Also, as delicious as they are, they don't remind me of a brownie at all...but that could be because I only make gooey, fudge-y brownies. In reality, it's probably more of a "banana bread sheet cake," but that's not as catchy.  

Bottom line-- Delicious. Like the mentioned Applesauce Bars, I think they get better (more moist) with a little time...so you can definitely bake them 2-3 days in advance. Also, it's unfortunate that you could not smell these baking. So good. It's too bad the little brother wasn't around to try one. He would've been so excited that I did not make them "healthy." 


Banana Bread Bars

Ingredients:
Bars
1/2 cup butter, softened
1 1/2 cup sugar
1 cup sour cream
2 eggs
3-4 ripe bananas, mashed
2 tsp vanilla
2 cups all purpose flour
1 tsp baking soda
3/4 tsp salt

Frosting
1/2 cup butter
4 cups powdered sugar
1 1/2 tsp vanilla
3-4 TBSP milk

Directions:

  • Heat your oven to 375 degrees and spray a 15x10 jelly roll pan with non-stick cooking spray. 
  • In a large bowl, cream together softened butter and sugar. Add sour cream, eggs, bananas and vanilla; beat. Add flour, soda, and salt; beat gently until combined. 
  • Spread batter evenly into baking pan. Bake 20-25 minutes, or until golden brown...or until a toothpick comes out clean.
  • While that's baking, heat the other stick of butter in a large saucepan over medium heat until boiling. Let it turn a delicate brown and then remove from heat.
  • Add the powdered sugar, vanilla, and milk. Whisk together until smooth. The texture should be thicker than a glaze, but thinner than your average frosting. 
  • Using a spatula, spread the warm frosting over the warm bars. If one or both are cool, you are going to have a really difficult time...good luck. 


Enjoy!


Wednesday, May 15, 2013

{Grain & Refined Sugar Free} PB Cookies

These are the other (somewhat healthier) peanut butter cookies I made this past weekend. First of all, the dough is incredible. Seriously, seriously incredible. The texture is like a fluffy frosting. Really, if you wanted, you could omit the egg and baking soda and use it as a peanut butter frosting. Or fruit dip. Or just eat it with a spoon... However, the cookies themselves have a really weird texture. They don't taste bad, in fact, they're kind of addicting. It's difficult to describe. They're moist and have this amazing peanut butter flavor. I have found that the texture is better if the cookies are frozen. (The cookies are still soft when frozen.) A little Nutella adds a nice touch. 


PB Cookies

Ingredients:
1 cup natural peanut butter (creamy or crunchy)
8 oz plain Greek yogurt (I used Fage 2%)
1/2 cup local honey
1 tsp natural vanilla
1/4 tsp sea salt
1/2 tsp baking soda
1 egg 

Directions:

  • Preheat oven to 350 degrees. Line a cookie sheet with parchment paper and your choice of grease.
  • Mix everything up in a bowl or use your stand mixer. Like I said, the texture will resemble a fluffy frosting. 
  • Use a cookie scoop (about 2 tsp), placing the drops of dough about 2" apart on the cookie sheet--they will spread!
  • Bake for about 10 minutes or until the edges are slightly golden.
  • Let cool for a couple minutes before transferring to a wire rack to cool completely. 
Makes about 36 cookies. Enjoy!


Tuesday, May 14, 2013

PB Nutella Cookies

Peanut Butter. Nutella. What more does a person need? Kidding! Kind of... I pinned this recipe a while back. Probably during class sometime... I was excited to have a reason to finally make them! I'm kind of loving all of the brother's senior festivities because I am getting to bake a lot. I like it when I can bake it, try it, and give the rest away. The dough for these babies was great. The cookies themselves were also pretty great. The brother said, "These are the best peanut butter cookies you've made." A big deal, considering he doesn't generally like peanut butter. Shame. Although, he claims, "It's not that I don't like peanut butter. It's just overused." I don't believe that it's possible to overuse peanut butter, but I'm kind of an addict. Either way, the cookies were tasty! They're pretty soft, not too dry like some PB cookies. And the Nutella is a great touch. 

I didn't mess with these, so you can click here to get the recipe from The Sisters Cafe.