Showing posts with label fall. Show all posts

Sunday, November 16, 2014

Chai Spice Buttercream Frosting

The mother's birthday is tomorrow, so we celebrated this afternoon. I decided to put a fall twist on The Best White Cake Ever by making a chai spice buttercream frosting. It was heavenly. I mean, anything with 4 sticks of butter tastes amazing, but it was rich and creamy with a perfect hint of chai. The brother said it tasted exactly like a chai tea latte he had the other day. Yum…

I'd imagine this frosting would be just as wonderful on say a spice cake, or even a pumpkin cake. I just opted for white because I'd actually had the cake in my freezer for the past several months. Thankfully, this particular cake freezes very well. It was still perfect. 


Chai Spice Buttercream Frosting

Ingredients:
4 sticks unsalted butter, room temperature
Pinch of salt
3 tsp vanilla
1 1/2 tsp ground cardamom 
1 1/2 tsp ground cinnamon
1/2 tsp ground ginger
1/4 tsp ground cloves
1/4 tsp ground nutmeg
5 cups powdered sugar
1 TBSP milk

Directions:
Beat the butter, salt and vanilla in a large mixing bowl until light and fluffy. Add the rest of the spices and mix until combined. Add the powdered sugar, one cup at a time, mixing thoroughly after each addition. Add about a TBSP of milk. Beat for about 5 minutes on high or until the frosting is light and fluffy.

Apply a thin layer of frosting to your cake (crumb coat). Put it in the fridge for about 15 minutes. Finish frosting your cake and decorate as desired. I simply sprinkled a little extra cinnamon on top!


Enjoy!

Thursday, January 23, 2014

Apple & Sausage Pie

Here is another recipe inspired by the need to use up some apples! It took me a while to find something I liked. I finally settled on a recipe from Peaches Please because I figured it'd be easy enough to work with. If you follow the link and compare it to my recipe, you will notice several differences. One of the more obvious being that I made one pie in a normal sized springform pan vs. four mini ones. I did this (1) because the mini pans come in sets of three…at least at Target… and (2) I really don't like rolling out pie dough that much. However, if you've got the supplies and time, the four mini pies are so much cuter. 


This pie smells divine. And it tastes amazing. Definitely a winner. It's perfect for fall or winter. Mine is obviously not that pretty. I was kind of pressed for time so I didn't even actually weave the lattice top or make the edges pretty. Luckily, its looks have nothing to do with the taste. Have I mentioned? The taste is fantastic.  


Apple & Sausage Pie

For the crust:
1 1/2 cups AP flour
1 1/2 cups WW flour
1 tsp Salt
3/4 cup Butter, very cold & cut into small pieces
1/4 cup Plain Greek yogurt
10-ish TBSP Ice water
  • Whisk together the flour & salt. Cut in the butter using a pastry blender or fork until you get an almost sandy texture. Stir in the yogurt and 3 TBSP water. Slowly add the rest of the water until the dough comes together. You may use more or less than 10 TBSP. Make sure it doesn't get too wet. Cover and put the dough in the fridge to rest for at least 30 minutes. 
For the filling:
1 1/4 lb Italian sausage (I like spicy chicken) 
3 Apples, peeled, cored & roughly chopped
1/2 cup Yellow onion, chopped
1/2 cup Celery, sliced
1 heaping tsp Sage
1 oz Apple cider vinegar 
1/4 cup Hard apple cider
Salt & pepper to taste
  •  Remove the sausage from their casings and cook in a nonstick skillet on the stovetop until cooked through & browning. Remove the sausage from the pan and place in a large bowl. Make sure to leave some of the grease for sautéing the onions & celery.
  • Saute the onions & celery in the sausage fat until they soften. Add the chopped apples, sage, ACV, and your salt & pepper. Cook, stirring occasionally, until the apples have softened. You may want to cover your pan for a couple minutes.
  • Add the apple mixture in with the sausage & stir. Be sure to leave the juices in the pan. Deglaze the pan with your hard apple cider (I used "The Saint" variety from Crispin). Reduce the pan juices & cider until thickened & pour them in the bowl with the apples & sausage. 
  • Preheat the oven to 350*F. Prepare your springform pan(s).
  • Separate the dough appropriately & roll it out to fit your pan(s). Trim the excess off the edges…you will need it!
  • Fill your pan(s) with the sausage & apple mixture.
  • Roll out the remaining dough & cut into strips to cover the pie. You can do a real lattice top & weave or do a faux one like me. You can just squish the edges together or make them look pretty, whatever you like/have time for.
  • Bake for about 40 minutes, ideally until the pastry has slightly browned. If it doesn't seem to be getting brown enough, you can crank up the oven to 400*F for a few minutes. If it's getting too brown too quick, cover the edges with foil.
  • Remove from the oven & let cool in the pan for about 10 minutes. Then, you can release the springform. Continue to cool until your mouth & hands won't get burned. 
Enjoy!

Wednesday, November 13, 2013

Decorating for Thanksgiving

My work week begins tonight, so I spent last night doing crafty things and decorating for fall. Yes, fall. I guess really more like Thanksgiving, if you want to get technical. I have many friends who have already decorated for Christmas. Don't get me wrong, I LOVE Christmas. But I feel like the time between asking strangers for candy and telling Santa about all the things you want is quite overlooked. 

And there's so much to be thankful for… Friends & family. Football is in full swing (although I wish my Sooners would play). NBA is revving up. Starbucks has red cups. I got to go to Zumba last night. And then tried out some Ballet Beautiful. Edy's has there slow churned egg nog ice cream out. It's appropriate to wear sweaters, boots & scarves. And I know there are many, many other things…but I've been awake since 11 AM yesterday… 

So, decorating for Thanksgiving. I obviously hit up Pinterest for some inspiration. I checked out Hobby Lobby, but they literally have like 1/2 an aisle for fall. The rest is Christmas. I knew I wanted to get a couple candlestick things to set little pumpkins on. There were a couple I liked at Hobby Lobby, but even 1/2 off, they were $15-$20/each. I found these at a thrift store for $2:


Ugly as all get out, but paint can do a lot of things.


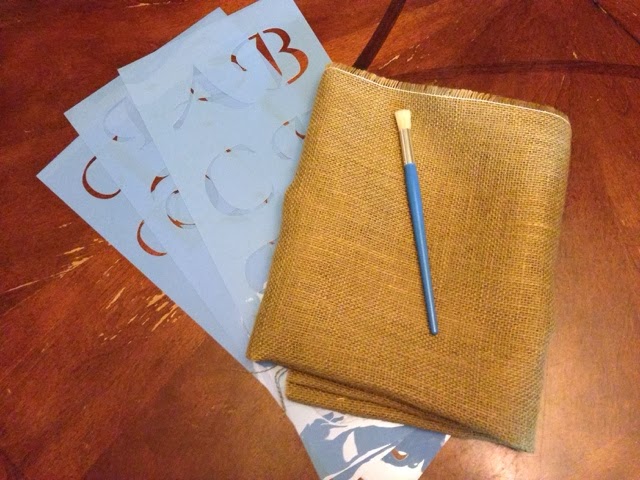
And, of course, there were no little pumpkins left at Hobby Lobby. I found these at home. Apples & pears are fall-ish fruits, right? I got some supplies to make a banner for the mantel. I already had paint & twine at home!


Ta-da! I would like to possibly add some colorful ribbon between the letters, but this will do for this year. I made a template in Pages and traced around it on the burlap. Cut out the pieces. Stenciled on the letters. Hot glued the twine on back. It's really handy having a reclaimed piano thingy as a mantel because it has these knobs that made it super easy to attach the banner. 


I don't really know how I feel about scarecrows, but this guy was another $2 thrift store find…so, why not?


Here's the whole picture. I'd like to add something to the wreath (next year). The milk can at the bottom is a family heirloom, filled with wheat from the family farm. Score. 


And then there's, Tom. I grabbed him for under $9 during Scentsy's Monster Monday Sale. You can grab yourself one by clicking here! 


Now, I should really go sleep before heading into work this evening. Hope everyone has a Happy Hump Day!

Tuesday, October 8, 2013

Pumpkin, Sausage & Spinach Calzones

I came across a recipe for pumpkin, sausage and spinach calzones in some magazine. Since I couldn't pin it, I lost track of the actual recipe. But what I ended up making was pretty stinking good. Totally delicious. Decently healthy. Yummy goodness.  


I decided on using the spicy/hot Italian chicken sausage from Sprouts. I like a little kick, but if that's not your thing, sweet Italian sausage would work too. Of course, you can go with turkey, pork, or whatever meat you like. You can also use your cheese of choice. I went with a white extra sharp cheddar. Again, I like things that have a little extra bite or whatever. For time's sake, I rounded up a recipe for no-yeast WW pizza crust from Kristin in Her Kitchen. I also saved some time by using frozen chopped spinach. 


Pumpkin, Sausage & Spinach Calzones

Ingredients for the crust:
1 1/2 cups WW flour
1/2 cup AP flour
1 tsp garlic salt
2 tsp baking powder
3/4 cup water
1/4 cup EVOO

Ingredients for the filling:
EVOO
8 oz Italian sausage
2 cups frozen chopped spinach
Salt & pepper
4 heaping TBSP pureed pumpkin
3-4 oz cheese, shredded 

Directions:
  • Preheat the oven to 450*F and grab a non-stick cookie sheet.
  • In a large bowl, combine the dry ingredients for the crust; whisk together. Add the water and EVOO. Mix well. Set aside.
  • In a saute pan, add some EVOO and heat it up on high. Add the sausage. Cook thoroughly. Remove the sausage from the pan. Turn the heat down to low.
  • Add a tad bit more EVOO to the pan (may not be necessary if you're using a sausage with more fat). Add the spinach, salt & pepper. Saute for a couple minutes, or until the spinach is warmed up. Remove from heat.
  • Divide your dough for the crust into 4 equal parts. Roll out into like 7-8" circles. Place 1 heaping TBSP of pumpkin and spread it around (leave about 1/4" around the edges). Divide up the spinach, sausage, and cheese between the circles. Fold each circle over. Use a fork and go around the edges to seal them. 
  • Place the calzones on your cookie sheet. You can spread a little EVOO on top. Bake for about 15 minutes, or until slightly golden. 
Enjoy!


Monday, October 7, 2013

Peanut Butter Pumpkin Bread with Chocolate Chips

And on my days off, I get on Pinterest and bake... It's kind of great how many things you can get done when Monday is your day off. Everyone else is working, so the day is yours. I slept in. Watched "Once Upon a Time" while I had my coffee and breakfast. I vacuumed and mopped. Did P90X-2. Showered. Made lunch. Ran errands (got my watch fixed, got part of my Halloween costume, went to Sprouts). Baked. Got some paperwork done. Pinned a million things. And I'm going to make kickboxing. Exciting stuff. 


So...Peanut butter. Pumpkin. Dark Chocolate. Score. The original recipe is from Crazy For Crust via Pinterest. I really hadn't intended to change anything...but it turned out that I only had 1 cup of AP flour on hand. Thus, I ended up doing 1 cup AP flour and 1 cup WW flour. Not bad. Generally, you can go half-and-half and not change things too much. Using all WW flour will change the texture. Of course, you can use whatever kind of chocolate chips you like...but I'm a dark chocolate kind of girl.


Peanut Butter Pumpkin Bread with Chocolate Chips

Ingredients: 
1/4 cup plain Greek yogurt
3/4 cup pumpkin puree 
2 eggs
1/2 cup natural peanut butter
1/4 cup granulated sugar
1/2 cup packed brown sugar
1 1/2 TBSP pumpkin pie spice
1 tsp baking soda
1 cup AP flour
1 cup WW flour
1 cup chocolate chips, divided

Directions:
  • Preheat the oven to 350*F and prepare a loaf pan with non-stick cooking spray.
  • In a large bowl (or your KitchenAid), mix together the yogurt, pumpkin, eggs, and peanut butter until smooth. Add sugars, pumpkin pie spice, and soda and mix. Mix in the flours. Stir in 3/4 cup of the chocolate chips. 
  • Pour the batter into the prepared loaf pan. It's thick so you'll need to even it out. Sprinkle the remaining chocolate chips on top.
  • Bake for about 30-35 minutes, depending on if you want it a little gooey in the center or baked through. 
  • Let it cool in the pan for a few minutes before transferring to your cutting board.
Enjoy!


Tuesday, November 20, 2012

Pumpkin Sheet Cake

One of my favorite fall things is baked treats that involve pumpkin.  I love pumpkin.  Except for pumpkin pie.  I made this pumpkin sheet cake for my Gamma family night, and then took the leftovers to class the next day.  I thought it was really pretty good.  Very moist.  I think the only things I did differently than the original recipe were adding a little extra cinnamon and basically doubling the cream cheese frosting recipe.  (I generally double frosting recipes just on principle.  I would rather have too much than be skimpy. I like frosting.)  Also, I elected to not put nuts on top.  Get the recipe by clicking here!


Not much else going on, except obviously nursing school is taking over my life.  However, I am done with clinical for the semester!  And I've got Thanksgiving break from last Wednesday afternoon through the 27th...then just a week and a half before finals!

Saturday, July 7, 2012

Warm Quinoa Cranberry Salad with Butternut Squash

I came across this yummy recipe on Pinterest one day.  Great find.  While, I'm sure it's technically more of a fall dish, we happened to have everything needed to make this tasty dish.  Kind of.  I realized after I started that I had dried cherries, not cranberries.  However, I don't think it really made a huge difference.  It was still scrumptious.  Other than using cherries, the only thing I really changed from the original recipe is not adding butter...which I just totally forgot about.  Also, I simplified the whole butternut squash cubing process buy using the frozen, already cubed kind, from Sunflower Markets.  The family thought it was pretty great too.  The only "problem" was my brother wished I had made some kind of meat too.  I explained to him that it was Monday, and, therefore, meatless.  In reality, I just wasn't up to also cooking meat.  Oh well.  Here you go:


Warm Quinoa Cranberry Salad with Butternut Squash

Ingredients: 
1  c quinoa
2  c vegetable or chicken broth (low-sodium)
1  bag frozen, cubed butternut squash 
1/2  medium red onion, thinly sliced or diced
1/2  c dried cranberries (or cherries)
1  sprig of rosemary & a sprinkle of sage
2  tbsp EVOO
1/2  tsp salt
1   tbsp apple cider vinegar

Directions:
Cook quinoa in pot with broth over high heat.  Bring to a boil.  Reduce heat to simmer.  Leave on stove for about 25 minutes or until broth is absorbed, stirring occasionally.  

Meanwhile, throw everything else into your Pampered chef steam-in-the-microwave thing.  Toss it around for a bit.  Cook it in the microwave until the butternut squash is cooked through and the onions are tender.  If you don't have a nifty steamer thing, you can bake it in the oven at 425.  

Once everything is done, mix the butternut squash mixture with the quinoa and add the apple cider vinegar.  Stir.  Serve.  Enjoy!